From Bob’s original Learning Nuggets archive. Instructions and screenshots refer to Trial Director 360.
With this latest version of Trial Director 360 (TD360), there is a multiplicity related to case creation for which you will want to be aware:
- When creating a new case while working in discovery][Local (dL) for purposes of processing or reviewing discovery, a new TD360 case also is created automatically.
- The TD360 case can only be accessed if a user has been provided rights to work in TD360
- If a new case is created while in Case Story (CS), a new TD360 case is also automatically created
- If appropriate rights have been assigned, a TD360 case can also be created while in Presentation (what TD360 is called when viewing the ‘beachball’ in dL).
- There is also a stand-alone version of TD360 that can be purchased, which would be another method for case creation.
When creating a TD360 case when in Presentation, CS, or the stand-alone version:
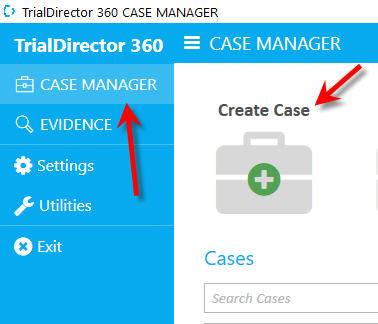
- After opening TD360/CS, click on Case Manager, then Create Case (Figure 1)
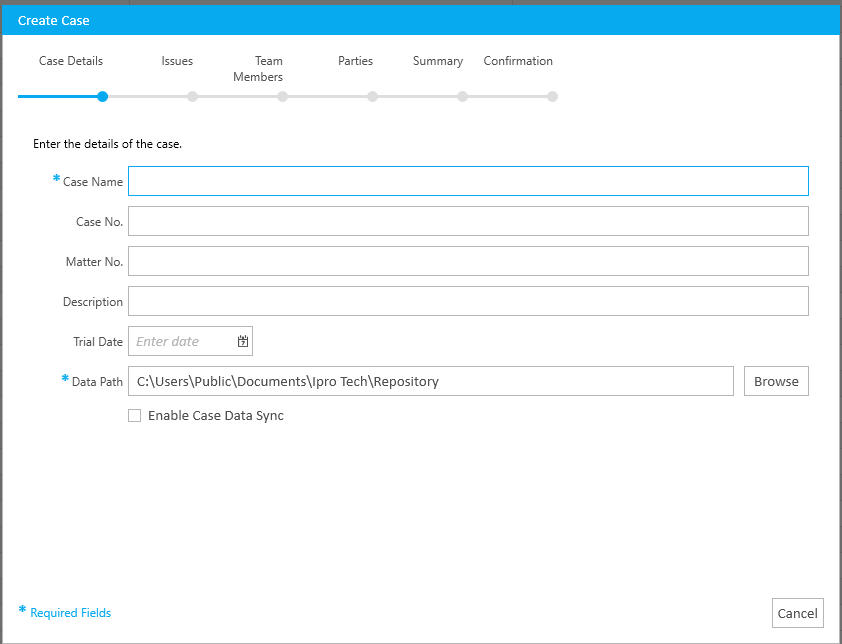
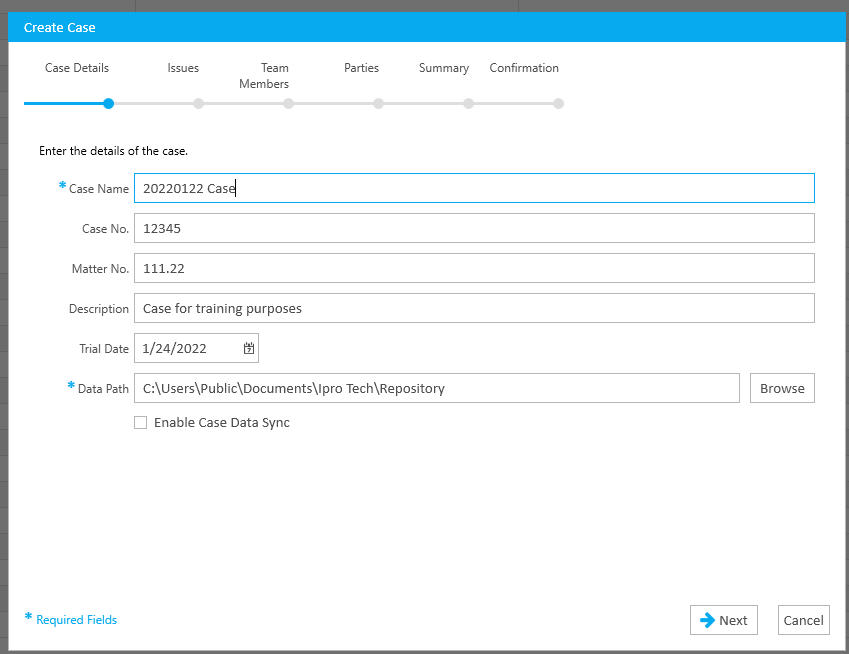
- You will be presented with the first (of five) pages of a Case Create wizard, Create Case-Case Details (Figures 2, 3)
- Case Name
- Required entry
- Enter the case name as you’d like to read within the software
- No longer will TD360 create a folder on your system with this entry
- No longer will TD360 create a folder on your system with this entry
- Required entry
- Case No.
- Optional entry
- Optional entry
- Matter No.
- Optional entry
- Optional entry
- Description
- Optional entry
- Optional entry
- Trial Date
- Optional selection
- Optional selection
- Data Path
- Change the default location if you want to create your case in a different location.
- The case is created in the location selected in Create Case-Case Details-Data Path
- The new case folder created will look something like this
- 7530c57b-7959-4f25-b37d-6b90dddf6b6f
- 7530c57b-7959-4f25-b37d-6b90dddf6b6f
- If you want something along the lines of a better practice
- BEFORE you create a new TD360 case, create a folder with an appropriate case folder name, under the Repository folder
- E.g., 20220122 New Case
- E.g., 20220122 New Case
- Then browse to that location when browsing to the Data Path
- The ‘hash-like’ folder will still be created, but you will have a much easier ability to find your case on your hard drive or network, should you ever need to
- BEFORE you create a new TD360 case, create a folder with an appropriate case folder name, under the Repository folder
- The new case folder created will look something like this
- Additionally, care must be taken with this data path location, depending on where the case is being shared on a network or a laptop drive
- The case is created in the location selected in Create Case-Case Details-Data Path
- In the case of a dedicated laptop for a trial scenario, you will want this location to be somewhere in the C:\ (i.e., local) hard drive.
- Change the default location if you want to create your case in a different location.
- Enable Case Data Sync
- This little box is perhaps the most important of all, particularly when the Data Path is pointing to a shared/network location.
- Enabling this feature will ultimately allow you to save the case to a laptop, pull the laptop from the network, and work on the case independently of the network (i.e., in a courtroom).
- Enabling this feature will ultimately allow you to save the case to a laptop, pull the laptop from the network, and work on the case independently of the network (i.e., in a courtroom).
- This little box is perhaps the most important of all, particularly when the Data Path is pointing to a shared/network location.
- Case Name
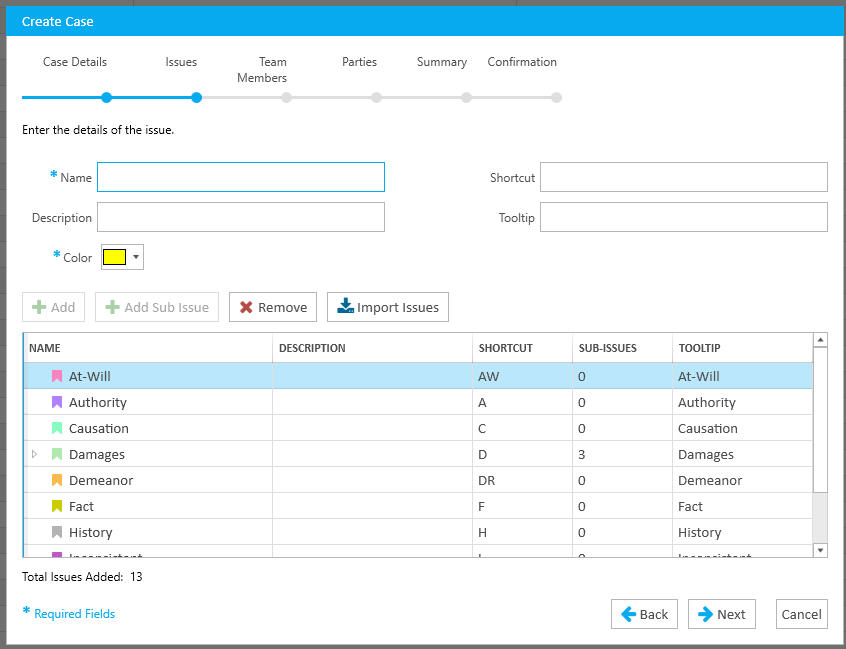
- Create case-Issues (page 2 of the wizard) (Figure 4)
- By default, TD 360 comes pre-loaded with issues configured, ready to use.
- Name
- The asterisk, in fact, all the asterisks that follow are not required to go to the next page of the wizard.
- They are however required if you wish to add an issue.
- They are however required if you wish to add an issue.
- The asterisk, in fact, all the asterisks that follow are not required to go to the next page of the wizard.
- Shortcut
- Optional entry
- Enter a one or two-letter shortcut key for the issue type (e.g. "F")
- You would then be able to use the shortcut key when assigning issues to documents or testimony
- You would then be able to use the shortcut key when assigning issues to documents or testimony
- Optional entry
- Description
- Optional entry
- A general description of the issue; why it might be applicable
- Optional entry
- Tooltip
- Option entry
- A short description that appears when the mouse hovers over the issue type (e.g. "This is a fact")
- Option entry
- Color
- Optional entry
- Select a color to help identify the issue type
- This color will also be helpful when generating a report that includes the transcript
- Optional entry
- Add/Add Sub Issue/Remove/Import Issues
- All optional entries
- All optional entries
- By default, TD 360 comes pre-loaded with issues configured, ready to use.
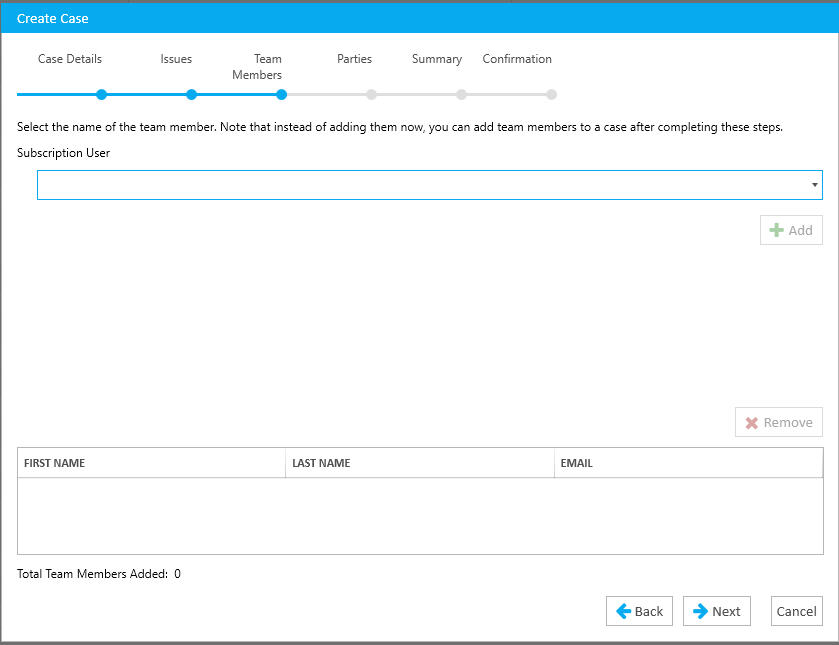
- Create Case-Team Members (page 3 of the wizard) (Figure 5)
- Subscription User/Add/Remove
- Optional choices
- Optional choices
- Team members listed here are persons that belong to your TD 360 subscription who you want to invite and give access to your case
- If you are working with a stand-alone license, or the license is only installed on this laptop and not to be shared, then no options will be available in the drop-down list.
- If you are working with a stand-alone license, or the license is only installed on this laptop and not to be shared, then no options will be available in the drop-down list.
- Subscription User/Add/Remove
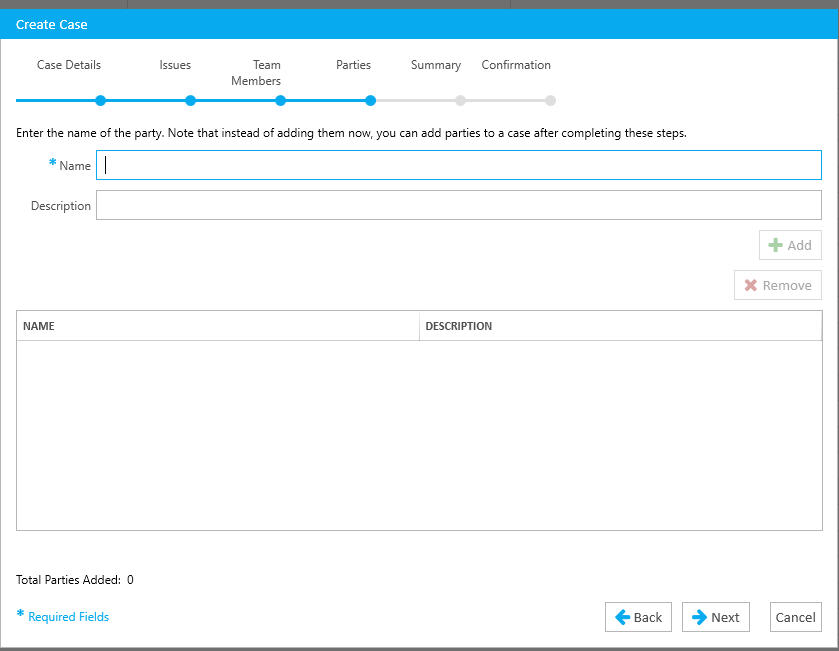
- Create Case-Parties (page 4 of the wizard) (Figure 6)
- Name
- Optional entry
- Enter a name here to keep track of the different parties (persons, organizations, etc.) involved in the case
- These parties can then be added to individual designations in the Designations feature.
- These parties can then be added to individual designations in the Designations feature.
- Optional entry
- Description
- Optional entry
- Examples: Plaintiff or Defendant
- Optional entry
- Add/Remove
- Use as necessary
- Use as necessary
- Name
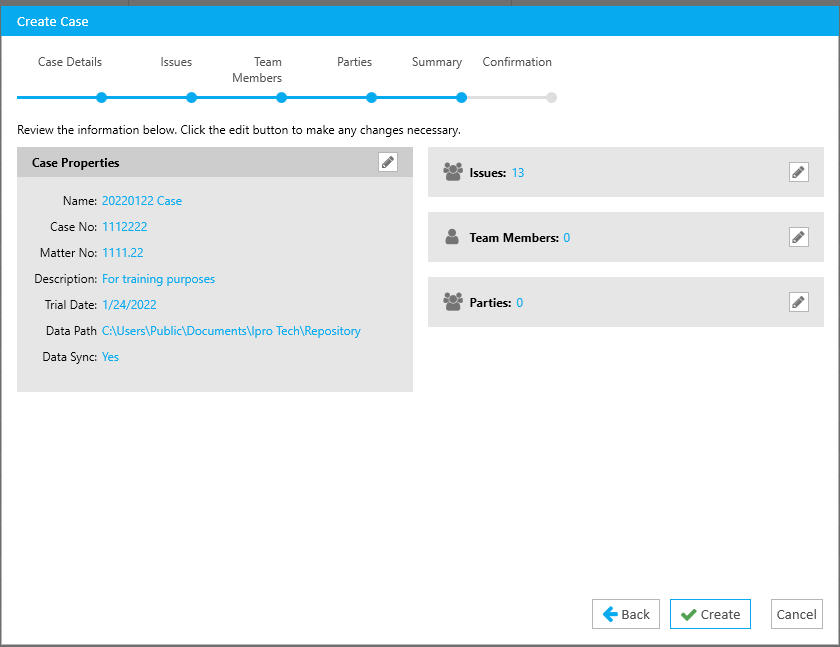
- Create Case-Summary (Figure 7)
- [Pencil icon] (Edit)
- Back/Create/Cancel
- [Pencil icon] (Edit)
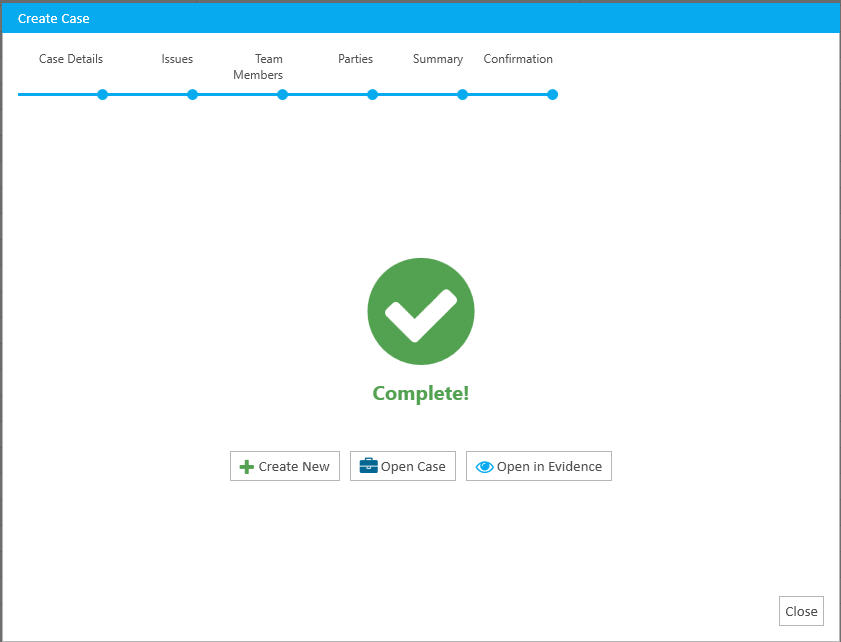
- Create Case-Confirmation (Figure 8)
- Create New
- This would allow you to create another new case
- This would allow you to create another new case
- Open Case
- This button allows you to open the Open Case feature, which resides in Case Manager
- Open Case allows you to further define elements you chose when creating the case, in addition to working with Designations and Exhibit Labels
- This button allows you to open the Open Case feature, which resides in Case Manager
- Open in Evidence
- Opens this new case in Evidence, to allow you to start loading and working with exhibits.
- Opens this new case in Evidence, to allow you to start loading and working with exhibits.
- Close
- Create New
When creating a case in dL, for purposes of processing or reviewing discovery:
- The main difference, given that a TD360 case is created as part of the review-side case creation process, is the case folder created for the review-side case is automatically created, meaning you have no options for where the TD360 case (specifically) is created.
- In fact, the ‘hash-value’ case name is created in the same folder as the case for the review side, which does retain the name of the case as you enter it
- Case Name for Review: 20220122 New Case
- Case Name for TD 360 for the very same case: 9700bae7-0dee-4fb8-8ea6-8256b49b4aa3
- Case Name for Review: 20220122 New Case
- In fact, the ‘hash-value’ case name is created in the same folder as the case for the review side, which does retain the name of the case as you enter it
- The steps for creating a case in dL will be discussed on the website for Ipro for Discovery (aka dL)
Instructional screenshots